


Sliding Wardrobe Doors for Sloped Ceilings: 2026 Guide
Table of Contents
- Understanding Sloped Ceiling Constraints Before You Buy
- Sliding vs Hinged Doors for Loft Conversions
- Measuring for Sliding Wardrobe Doors on an Angled Ceiling
- Angled Ceiling Wardrobe Brackets: What You Need to Know
- How to Install Sliding Wardrobe Doors for Sloped Ceilings
- Troubleshooting Common Alignment Issues with Angled Ceiling Wardrobes
- Made-to-Measure vs Modular Sliding Wardrobes: Cost and Fit Compared
- Conclusion
Last Updated: August 17, 2026
Fitting sliding wardrobe doors for sloped ceilings requires solutions that standard systems simply cannot provide. At DoorsDirect, we've helped homeowners and trade professionals navigate this challenge, from compact attic bedrooms to full loft conversions with dramatic rake angles. This guide covers everything from understanding your room's constraints and taking accurate measurements, through to installation, troubleshooting, and choosing between made-to-measure and modular options.
Understanding Sloped Ceiling Constraints Before You Buy
Sloped ceilings fundamentally change what sliding wardrobe doors can and cannot do in a given space, and ignoring that reality before you order is an expensive mistake.
How Room Geometry Affects Your Wardrobe Options
A sloped ceiling creates a tapering vertical height across the room width. Where a standard bedroom offers consistent floor-to-ceiling dimensions, an attic bedroom typically presents full height towards the ridge and sharply reduced height under the eaves. Your wardrobe cannot simply run the full width at a consistent height. You have three realistic options: position the wardrobe entirely within the taller zone, step the height across multiple sections, or commission a made-to-measure solution that accommodates the angle directly.
The third option is almost always the right call for loft conversions. Stepping heights across sections creates visible breaks in door panels and rarely looks intentional. A bespoke wardrobe designed around the actual room geometry produces a cleaner, more integrated result.
Minimum Vertical Height Requirements for Sliding Door Tracks
Sliding door tracks require minimum clearance to function. The floor track and top track combined with the door panel height mean you need sufficient vertical space for the mechanism to operate without the panel fouling the rafter or plasterboard above.
Most sliding door systems require a minimum finished vertical height of around 1950mm to accommodate the track hardware and a usable door panel. Below that threshold, the wardrobe run should begin where the ceiling height allows it.
Sliding vs Hinged Doors for Loft Conversions
Sliding doors win for loft conversions. Hinged doors need clear floor space to swing open, eating into the already compressed usable floor area. A sliding door runs parallel to the wardrobe face, requiring no additional clearance in front of it.
A hinged door on a full-height wardrobe positioned near the ridge can conflict with the ceiling as it opens. Sliding doors avoid this entirely because they travel horizontally rather than rotating outward. The one genuine advantage of hinged doors is full-width access in a single movement, but for most loft conversions, the space-saving benefit of sliding doors outweighs this.
According to NHBC guidance on loft conversions and usable space, habitable rooms in loft conversions must meet minimum height requirements over a defined floor area, which further limits where you can position furniture. Sliding doors help maximise the usable zone by eliminating swing clearance requirements.
Measuring for Sliding Wardrobe Doors on an Angled Ceiling
Accurate measurement is the single most critical step in this entire process. Get it wrong and no amount of adjustment will make the doors fit correctly.
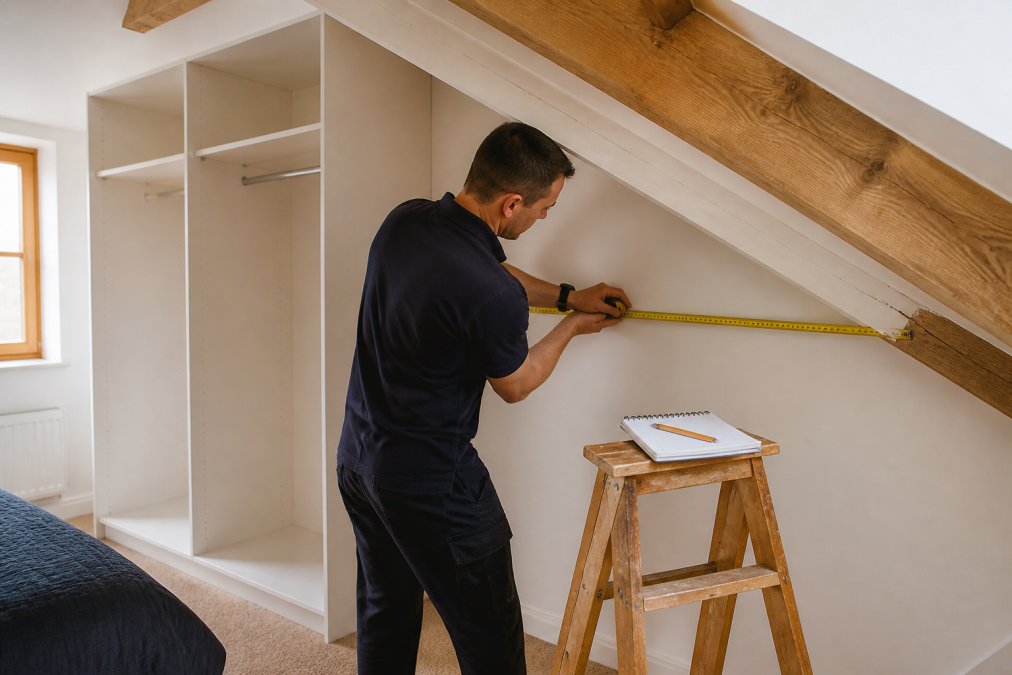
Step-by-Step: Taking Accurate Measurements Under Eaves
Measuring for sliding wardrobe doors on an angled ceiling requires more data points than a standard room:
- Measure the floor width of the intended wardrobe opening from wall to wall in millimetres.
- Measure the vertical height at the tallest point from finished floor level to the underside of the ceiling or rafter.
- Measure the vertical height at the shortest point of the opening.
- Calculate the angle of the slope. Mark two points on the sloped ceiling 1000mm apart horizontally and measure the vertical drop between them. This gives you the rise-over-run ratio your supplier needs.
- Check the floor for level. Attic floors are frequently not perfectly level. Record any deviation.
- Measure the depth available from the wardrobe back to the wall, including any skirting or plasterboard irregularities.
Pass all six measurements to your door supplier. A made-to-measure manufacturer can use these to produce door panels with an angled top rail that follows the ceiling line precisely.
Common Measuring Mistakes and How to Avoid Them
The most common mistake is measuring to the ceiling plasterboard rather than to the structural rafter above it. If the plasterboard is not fixed tight to the rafter, your measurement may be optimistic by 20-40mm. Always probe gently with a bradawl to locate the rafter line before finalising your height measurement.
A second frequent error is measuring at only one point along the width and assuming the angle is consistent. Take height measurements at 300mm intervals across the full width and note any variation.
Angled Ceiling Wardrobe Brackets: What You Need to Know
Angled ceiling wardrobe brackets allow the bracket body to pivot so the track remains horizontal even when the fixing surface is not. Most quality angled bracket systems offer adjustment across a range of angles, typically up to around 45 degrees from horizontal. Check the specification of any bracket against your ceiling angle before ordering.
Structural Support and Load-Bearing Considerations
Sliding wardrobe doors are heavier than they look. A pair of full-height door panels can weigh considerably more than timber-faced panels of the same size. The top track carries a significant proportion of this load, and the brackets transfer that load into the ceiling above.
In a loft conversion, the ceiling structure is typically formed by the rafters and ceiling joists below them. Plasterboard alone cannot carry the bracket load safely. Every top track bracket must be fixed into a rafter or structural timber nogging, not just into plasterboard. Use a stud finder or rafter detector to locate the structural timbers before drilling.
As the Structural Timber Association's guidance on timber frame fixings makes clear, fixings into timber framing must penetrate sufficiently into the structural member to achieve the required pull-out resistance. For wardrobe track brackets, aim for a minimum 50mm penetration into the rafter using appropriate wood screws rated for the load.
If your rafter positions don't align with your bracket spacing, fix a horizontal timber batten across two or more rafters and use that as your fixing substrate.
How to Install Sliding Wardrobe Doors for Sloped Ceilings
Installation follows the same broad sequence as a standard fit, with additional steps for angle adjustment and careful alignment checks at each stage.
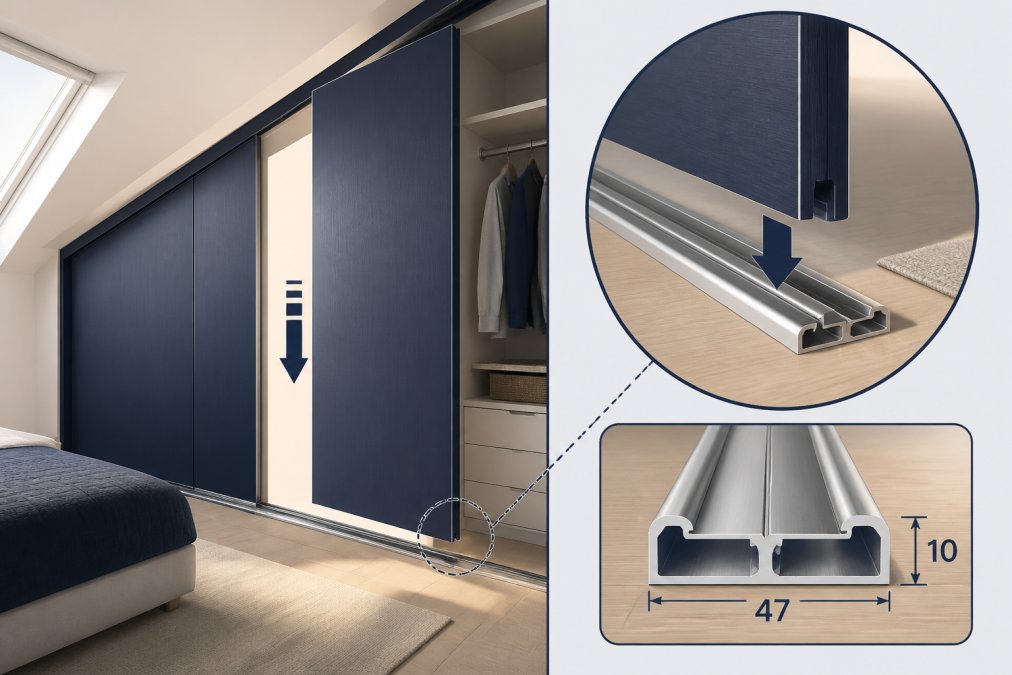
Step 1: Fix the Floor Track and Top Track
Lay the floor track in position and use a spirit level to confirm it is perfectly level across its full length. In an attic room with an uneven floor, you may need to pack beneath the track at one end. Once level, mark the fixing hole positions, drill into the floor, and secure the track.
Fix the angled ceiling brackets next. Set each bracket to the correct angle to compensate for the ceiling slope, then fix into the structural timber above. Hang the top track from the brackets and check it is parallel to the floor track in both plan and elevation. The two tracks must be directly above one another; any offset will cause the door panels to bind or drift.
Step 2: Hang the Door Panels and Adjust Alignment
Lift each door panel and engage the top rollers into the top track first, then lower the bottom pivot or guide into the floor track. With the panel hanging freely, check it for plumb using a spirit level held against the face of the panel.
Most sliding door systems include an adjustment mechanism on the top roller carriage that allows you to raise or lower each corner of the panel independently. Use this to bring the panel to plumb and to set the correct clearance between the panel top rail and the ceiling. The angled top rail should run parallel to the ceiling slope, leaving a consistent small gap of around 3-5mm.
Check the door slides smoothly across the full travel of the track. Any stiffness usually indicates the top and floor tracks are not perfectly parallel. Adjust bracket heights incrementally until the door runs freely.
Step 3: Fit End Panels and Strike Plates for a Clean Finish
An end panel provides a finished vertical face where the wardrobe terminates away from a wall. The DoorsDirect End Panel Premium (£78.00) is sized at 2750mm x 640mm x 18mm and can be cut down on site if your ceiling height is lower.

A strike plate is fitted where the door closes against a wall, covering any gap caused by wall irregularities or plasterboard returns. The DoorsDirect Strike Plate Premium (£26.00) can be trimmed to fit, which is particularly useful in loft conversions where walls are rarely perfectly flat.

Fit end panels plumb and fix through into the wardrobe frame. Fit strike plates to the wall face, ensuring the door closes cleanly against them without rattling.
Troubleshooting Common Alignment Issues with Angled Ceiling Wardrobes
Even a carefully installed wardrobe can develop alignment issues over time, particularly in loft conversions where timber movement with seasonal humidity changes is common.
| Problem | Likely Cause | Fix |
|---|---|---|
| Door drifts open or closed | Floor track not level, or tracks not parallel | Re-level floor track; adjust top bracket heights |
| Door binds mid-travel | Top and floor tracks offset in plan | Check track alignment from above; refix top track |
| Panel top rail fouls ceiling | Insufficient clearance set during install | Lower panel using roller adjustment mechanism |
| Door rattles when closed | Strike plate gap too wide | Reposition strike plate closer to door face |
| Roller carriage jumps track | Overloaded or worn roller | Replace roller carriage; check door panel weight against track rating |
The most persistent issue in angled ceiling wardrobes is the panel top rail gradually fouling the ceiling as the building settles. Set a clearance of at least 5mm at installation to build in tolerance for seasonal movement.
Made-to-Measure vs Modular Sliding Wardrobes: Cost and Fit Compared
For most loft conversions, made-to-measure is the clear choice. Modular sliding wardrobe systems are designed for standard rectangular rooms with flat, level ceilings. In a room with a sloped ceiling, a modular system can only be positioned in the section where the ceiling is flat and high enough, sacrificing a significant portion of the wall.
Made-to-measure sliding wardrobe doors are manufactured to your exact dimensions, including the ceiling angle. The door panel top rail is cut at the angle you specify, so the panel follows the ceiling line. This allows the wardrobe to run the full width of the available wall, maximising storage capacity.
Made-to-measure doors cost more than modular equivalents, but the comparison is not straightforward: a modular system covering only two-thirds of your wall is not delivering two-thirds of the value of a made-to-measure system covering the whole wall. The usable storage gain from a full-width wardrobe in a loft bedroom is substantial.
As the Royal Institute of British Architects' guidance on loft conversion design notes, maximising usable floor and storage area in loft conversions is a primary design objective. A made-to-measure wardrobe directly serves that objective in a way modular systems cannot.
| Factor | Made-to-Measure | Modular |
|---|---|---|
| Fits sloped ceiling | Yes, to exact angle | No, rectangular panels only |
| Covers full wall width | Yes | Partial (height-limited zones only) |
| On-site cutting required | Minimal | Often significant |
| Finish quality | Consistent, factory edge | Cut edges may need finishing |
| Lead time | Longer (manufactured to order) | Shorter (off-the-shelf) |
| Best for | Loft conversions, awkward geometry | Standard rectangular rooms |
DoorsDirect specialises in made-to-measure sliding wardrobe doors with a three-stage quality check process and a ten-year guarantee on all products. Every order is manufactured to your supplied measurements, and the team provides expert guidance from measurement through to final fit, whether you're a homeowner tackling a loft bedroom or a joiner fitting out multiple units on a development project.
Frequently Asked Questions
Can you have sliding wardrobe doors on a sloped ceiling?
Yes. The key is that the floor track and top track must be level and parallel to each other, even when the ceiling above them slopes. The top track is fixed to a horizontal batten or framework attached to the rafter or plasterboard at the correct height, not directly to the sloped ceiling surface. Made-to-measure sliding wardrobe doors are then cut to the exact height of that opening, so the door panels fit perfectly within a square frame regardless of the angle of the ceiling above.
Do I need special brackets for angled ceiling sliding doors?
Standard sliding door hardware mounts to a horizontal surface. When the ceiling slopes, you need angled ceiling wardrobe brackets or a timber batten framework to create a level mounting point for the top track. The brackets allow angle adjustment so the track sits true even when the rafter or plasterboard above it is not horizontal. Without this, the sliding mechanism will bind or the door panels will sit out of plumb, causing alignment problems over time.
Are sliding doors better than hinged doors for sloped ceilings?
Sliding wardrobe doors are almost always the better choice in a loft conversion or attic bedroom. Hinged doors need clear floor space in front of them to swing open, which is often impossible where a sloped ceiling meets the floor. Sliding doors move along a floor track and top track, staying within the wardrobe footprint. This makes them far more practical under eaves, where usable standing height is limited and every square centimetre of floor space matters.
How do you measure for sliding wardrobe doors under eaves?
Measure the width of the opening at three points: top, middle, and bottom. Use the smallest figure. For height, measure from the finished floor to the underside of the top track batten at multiple points across the opening, and again use the smallest figure. Record where the ceiling begins to slope and note the clearance at each side. Pass all measurements to your made-to-measure supplier so door panels and frame components are cut to suit your exact opening rather than a standard size.
Sloped ceilings make wardrobe planning genuinely difficult, but the problem is solvable with the right measurements, the right brackets, and doors made specifically for the space. DoorsDirect provides made-to-measure sliding wardrobe doors built to your exact ceiling angle, backed by a ten-year guarantee and a three-stage quality check that means what arrives on site is ready to hang. Get started with DoorsDirect and have a wardrobe that fits your loft conversion perfectly, first time.
This article was written using GrandRanker
Leave a comment